How to make a unique flavoured e-liquid NZ just for you?
The VapePenZone team, dedicated to the vape industry for 15 years, spent two weeks putting together the easiest beginner’s guide for you in just the following 5 steps!
- Making recipes with the e-liquid-recipes.com
- Place the bottle on the electronic scale
- Transfer the ingredients to the bottle
- Mix the ingredients of the e-liquid inside the bottle
- Wait for a few minutes and the e-liquid DIY will be successful
This guide will show you how to make vape juice at home by hand, covering the required materials, tools, detailed steps, and practical tips, so that you can finish a bottle of vape juice just for you in just a few minutes!
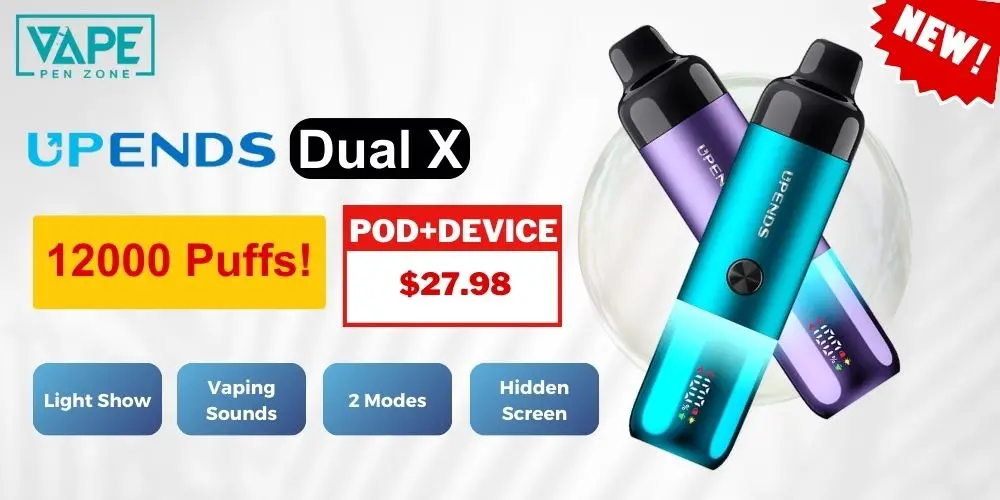
GOGO Shock E12000 Pod Bundle | Beginner-Friendly

The GOGO Shock E12000 is a top-choice vape pods NZ! With 10+ easy flavour swaps, a secure child lock, and a smart LED indicator, it suits every vaper. Get yours at Vape Pen Shop with bundle deals starting from just $39.98!
How To Make Vape Juice At Home – Materials & Tools
Before you start making vape juice, you need to prepare some basic materials and tools.
Necessary Materials
PG (Propylene Glycol)
PG is a colourless, odourless liquid used primarily to enhance flavour and provide a stronger throat hit.
E liquid juice NZ with a higher percentage of PG are suitable for use in MTL devices, which are closer to the experience of a traditional cigarette.
VG (Vegetable Glycerin)
VG is a thicker liquid that produces a thicker vapour and provides a smoother mouthfeel. E-liquids with a higher percentage of VG are better suited for DTL devices for a richer vapour effect.
Nicotine
Depending on your personal needs, you may choose to add a nicotine solution.
The concentration of nicotine is usually calculated in mg/ml, such as 3mg, 6mg, 12mg and so on. If you don’t need nicotine, you can also omit this material.
Flavouring
The flavours of vape juice are provided by specialized food-grade flavourings, and common flavours include fruit, dessert, tobacco, menthol, and more.
It is generally recommended to use 5%-15% flavor concentrates and adjusts the concentration to your personal preference.
Necessary Tools
Container Bottles
Choose bottles that are durable and easy to store. Glass bottles of 50 ml or more are usually recommended for easy blending and storage of vape juices.
Syringes
Used for precise proportioning of PG, VG, nicotine and flavouring ingredients.
Electronic Scale
The use of electronic scales (accurate to 0.01g) helps to accurately measure the proportions of each material to ensure the quality of the vape juice.
Gloves
Wearing gloves prevents the nicotine liquid from coming into direct contact with the skin, avoiding irritation or accidental absorption and ensuring safe handling.

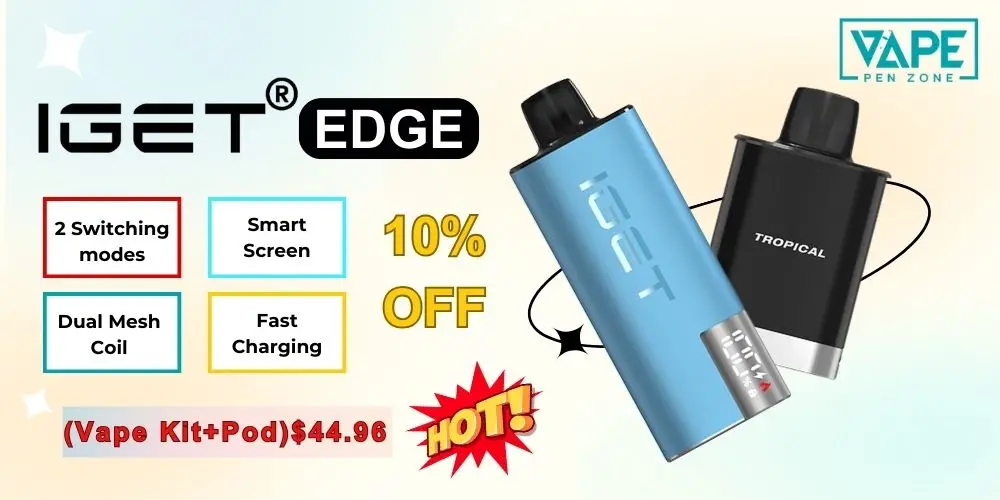
IGET Bar Plus 3.0 Kit 10000 Puffs HOT SALE
How To Make Vape Juice From Scratch – 5 Easy Steps

#1 Making recipes with the e-liquid-recipes.com
First, after opening e-liquid-recipes.com, enter the total amount of vape juice you wish to make, the nicotine concentration and the VG/PG ratio.
Next, enter the concentration and PG/VG ratio of the nicotine solution you purchased and add the information for flavourings.
After completing these steps, the system will automatically generate a detailed e-liquid recipe that clearly lists the grams or millilitres of each ingredient.
#2 Place the bottle on the electronic scale
Next, place the empty bottle on the scale and press the “Tare” button to zero the scale.
This step is crucial to ensure that the weight of each ingredient you pour into the bottle is correct and that the ratio of the e-liquid is accurate.
#3 Transfer the ingredients to the bottle
According to the recipe, transfer the nicotine, flavourings, PG and VG into the bottle in order.
It is recommended to wear gloves and use a clean syringe for the operation to ensure safety and hygiene.
Tips: Each ingredient should be used in a separate syringe to avoid cross-contamination and to ensure accurate measurements to prevent dispensing errors from affecting the quality of the final vape juice.
#4 Mix the ingredients of the e-liquid inside the bottle
After screwing the cap on tightly, shake the bottle vigorously for more than 1 minute to make sure the nicotine, flavourings, PG and VG are fully blended.
#5 Wait for a few minutes and the e-liquid DIY will be successful
Once the mixing is complete, let the e-liquid sit for 5-10 minutes to fully blend the ingredients.
At this point, your DIY vape juice is complete and you can start enjoying your exclusive vaping experience!
Important Tips
Successful DIY vape juices are more than just simply mixing ingredients. They also require a number of techniques to ensure that the e-liquid tastes better and has a longer shelf life.
#1 How to make vape juice taste better?
Steeping helps the vape flavours to blend. If you are not in a hurry to use it, it is recommended to let it sit for 1-2 weeks so that the flavour becomes more mellow.
At the same time, regular shaking of the e-liquid will prevent the ingredients from settling and ensure that the flavours remain uniform.
#2 How to make vape juice last longer?
It is recommended to store your vape juice in a dark glass bottle in a cool, dry place to minimize the effects of light.
Also, tighten the cap of the bottle after each use to avoid oxidizing the vape juice and shortening its shelf life.
Verdict
According to the 5 simple steps about how to make vape juice, you can create your exclusive vape juice and ensure that the flavour and experience are both ideal!
If you want quality vape juices now, then VapePenZone NZ welcomes you!
Related Articles: